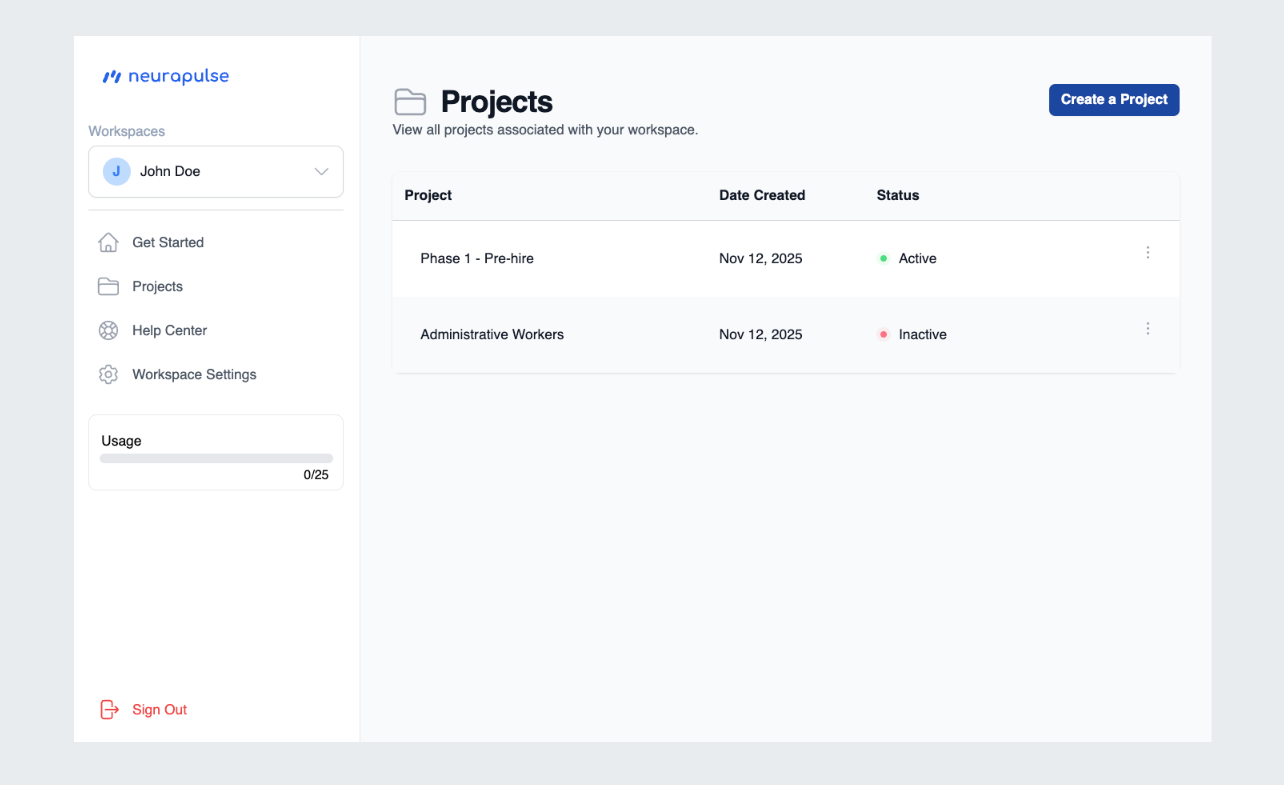
Accessing Projects
- Click “Projects” in the navigation menu
- View your list of projects. Active projects allow for tests to be taken and inactive projects do not.
Project Details
Each project entry displays:- Project Name
- Status Information
- Actions Menu
⋮for editing its settings
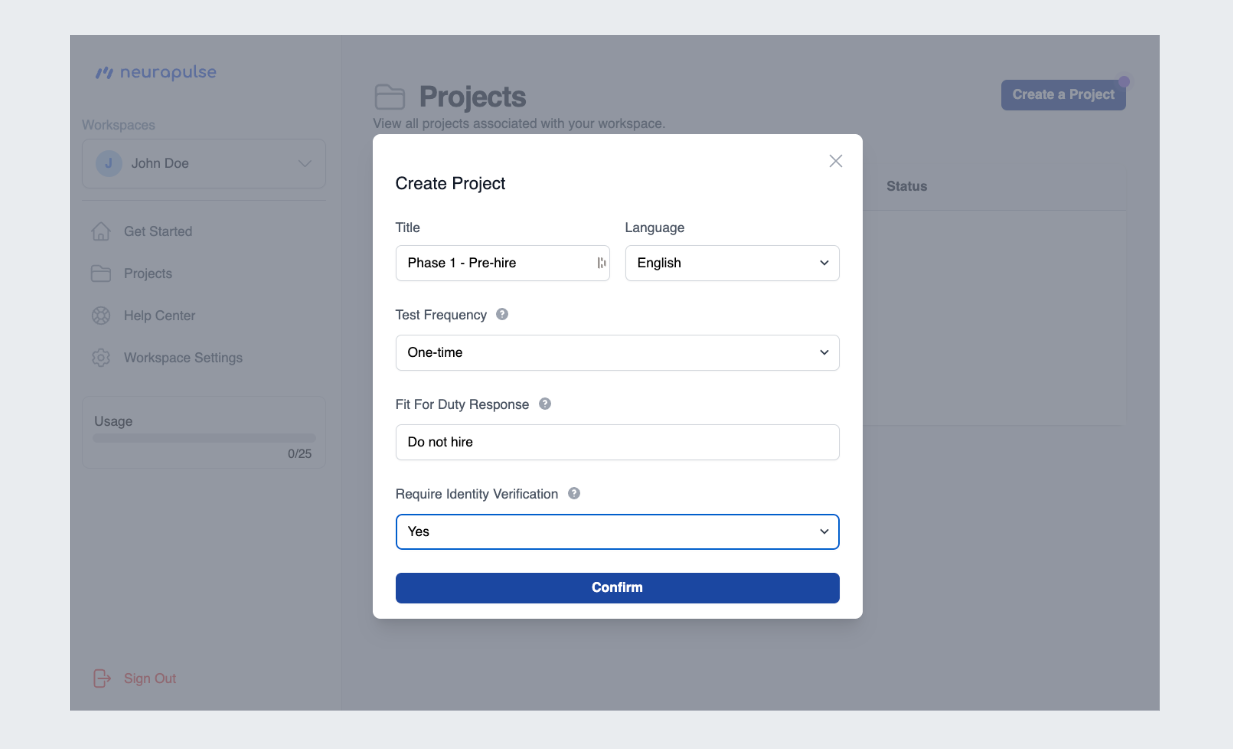
Editing a Project
-
Click the
⋮button next to the project name -
Update settings, including:
- Title
- Language
- Test frequency settings
- Fit For Duty Response
- Identity Verification
- Click “Confirm” to apply changes
The Identity Verification setting allows you to require test takers to verify
their identity using a photo ID before taking the assessment. When enabled,
test takers must complete an identity verification process that matches their
live face photo with their ID.
Project Dashboard
Click on a project name to access its dashboard, which includes:- Group safety metrics
- Individual results for test takers
- Test taker management options, such as editing and deleting test takers
Dashboard Metrics
- Safety Rating - The average percentage of completed assessments classified as safe over the selected period. The change shows how this average compares to the previous equivalent period.
For a 7-day period: If the average Safety Rating for the past 7 days is 85%
and it was 80% for the 7 days before that, the change would be shown as “+5%
from previous week”.
- Test Completion Rate - The average percentage of started assessments that were completed over the selected period. The change indicates how this average compares to the previous equivalent period.
For a 7-day period: If the average Assessment Completion rate for the past 7
days is 90% and it was 95% for the 7 days before that, the change would be
shown as “-5% from previous week”.
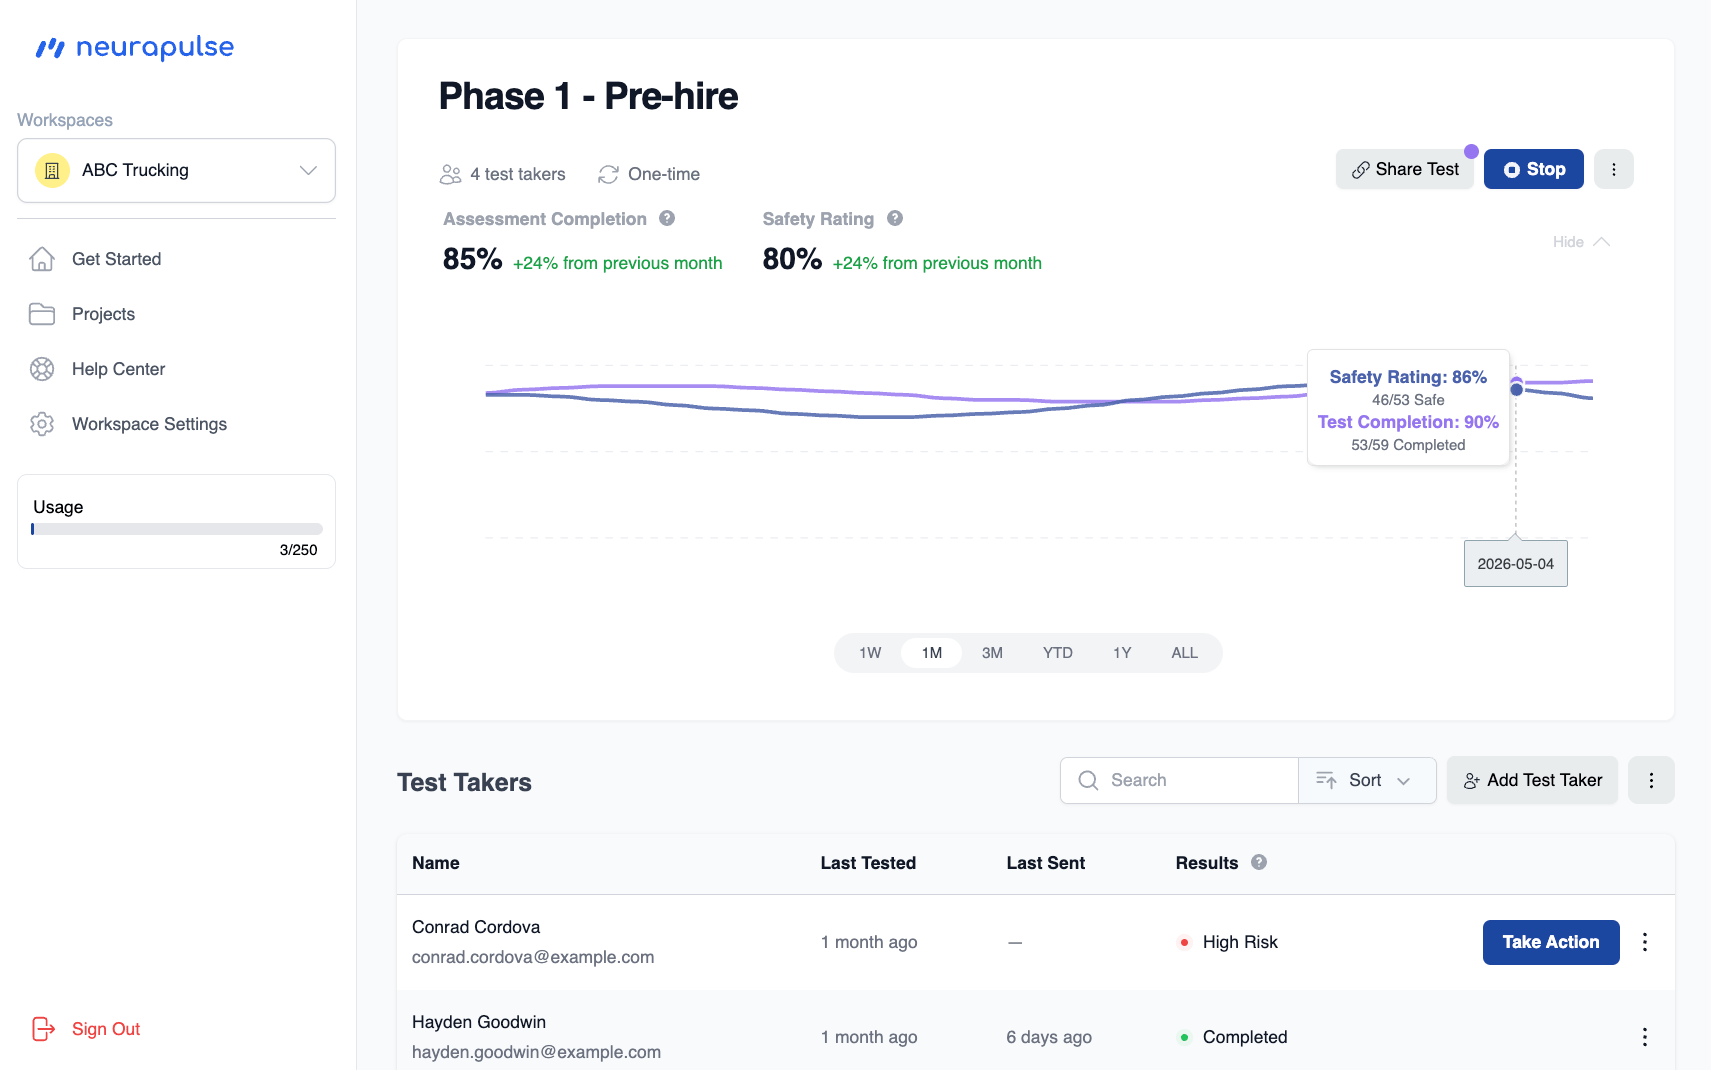
Test Takers
- View individual results
- Add individual test takers or import via CSV
- Edit/delete test takers
You can collapse/expand the chart at the top of the page to focus on
individual results (see below). The button is located below the project’s
Run/Stop button.
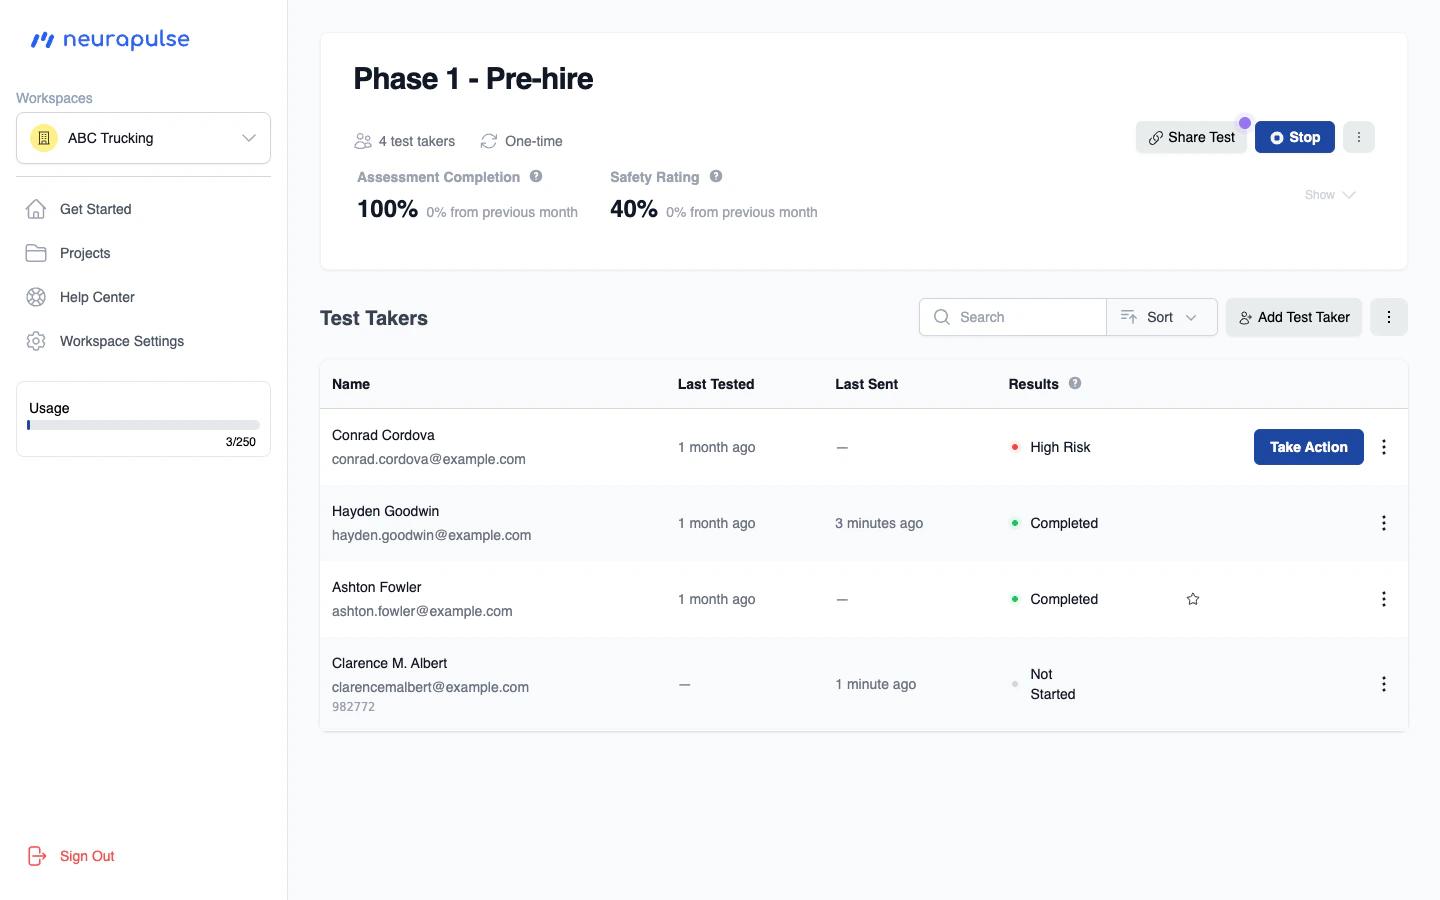
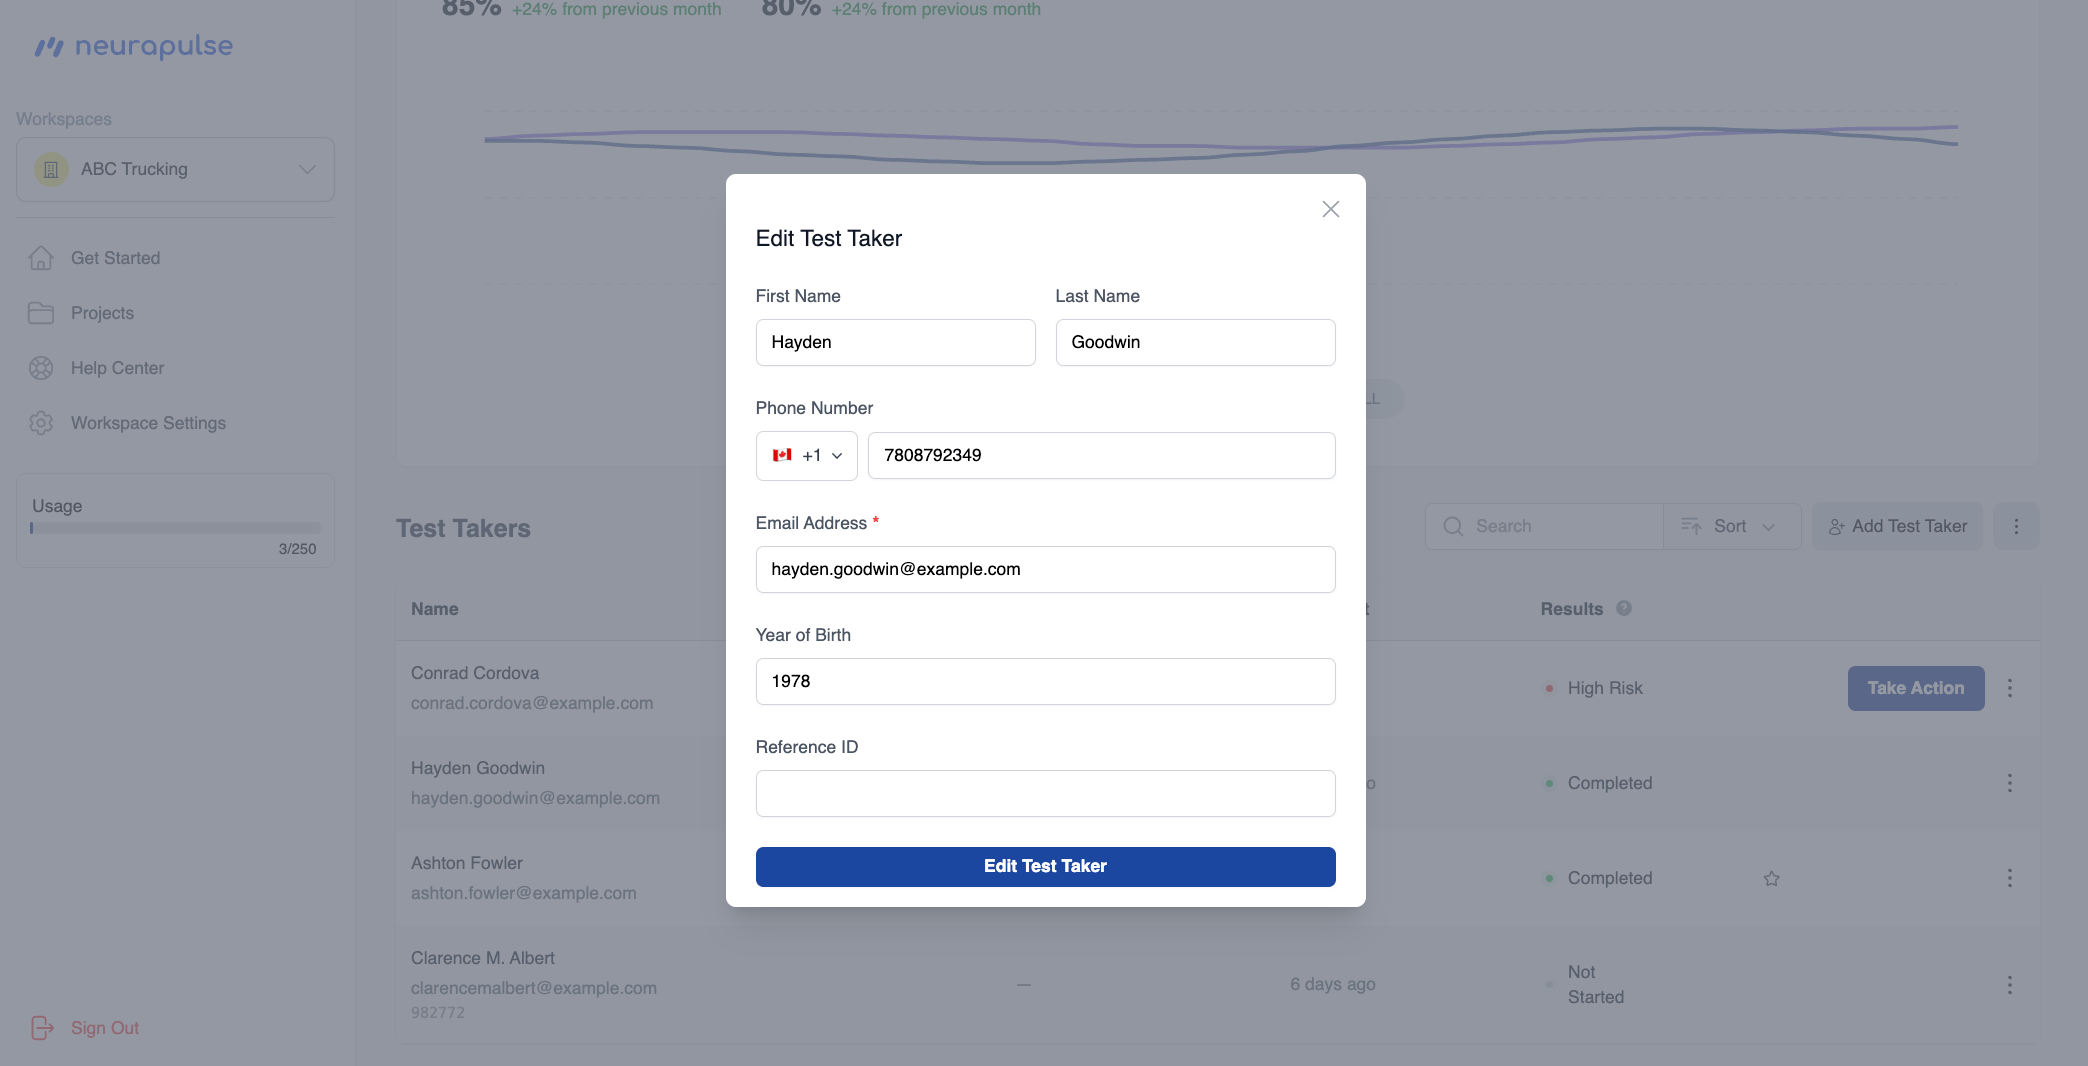
Editing a Test Taker
- To edit/delete a test taker, click on the
⋮button
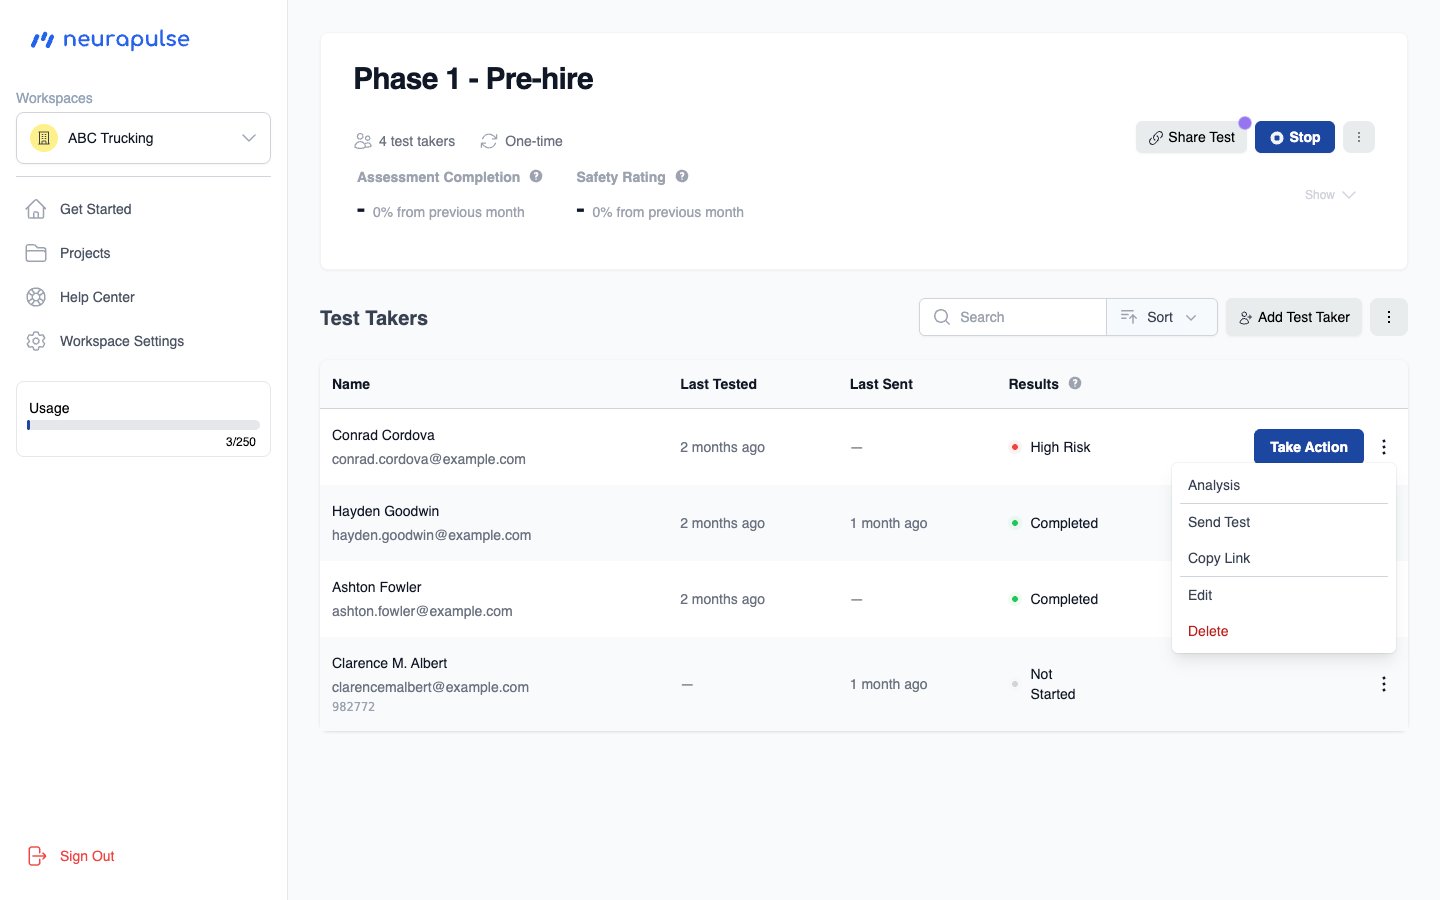
- Update the details and click the Edit Test Taker button to save changes
Adding a single test taker
You can add one test taker at a time from the Test Takers section.- Open your project’s dashboard
- In the Test Takers section, click + Add Test Taker (at the top of the section, next to Search and Sort on desktop; above Search on smaller screens)
- Enter the required field: Email Address
- Optionally enter: First Name, Last Name, Phone Number, Year of Birth (4-digit year, e.g. 1985), and Reference ID (e.g. an employee ID)
- Click Add Test Taker to save
Importing Test Takers via CSV
You can bulk import test takers by uploading a CSV file. This is useful when adding multiple test takers at once. To import test takers, you can use either method: Method 1: Drag and Drop- Navigate to your project’s dashboard
- Drag your CSV file over the test taker table - a visual indicator will appear showing where to drop the file
- Drop the CSV file onto the table when you see the drop indicator
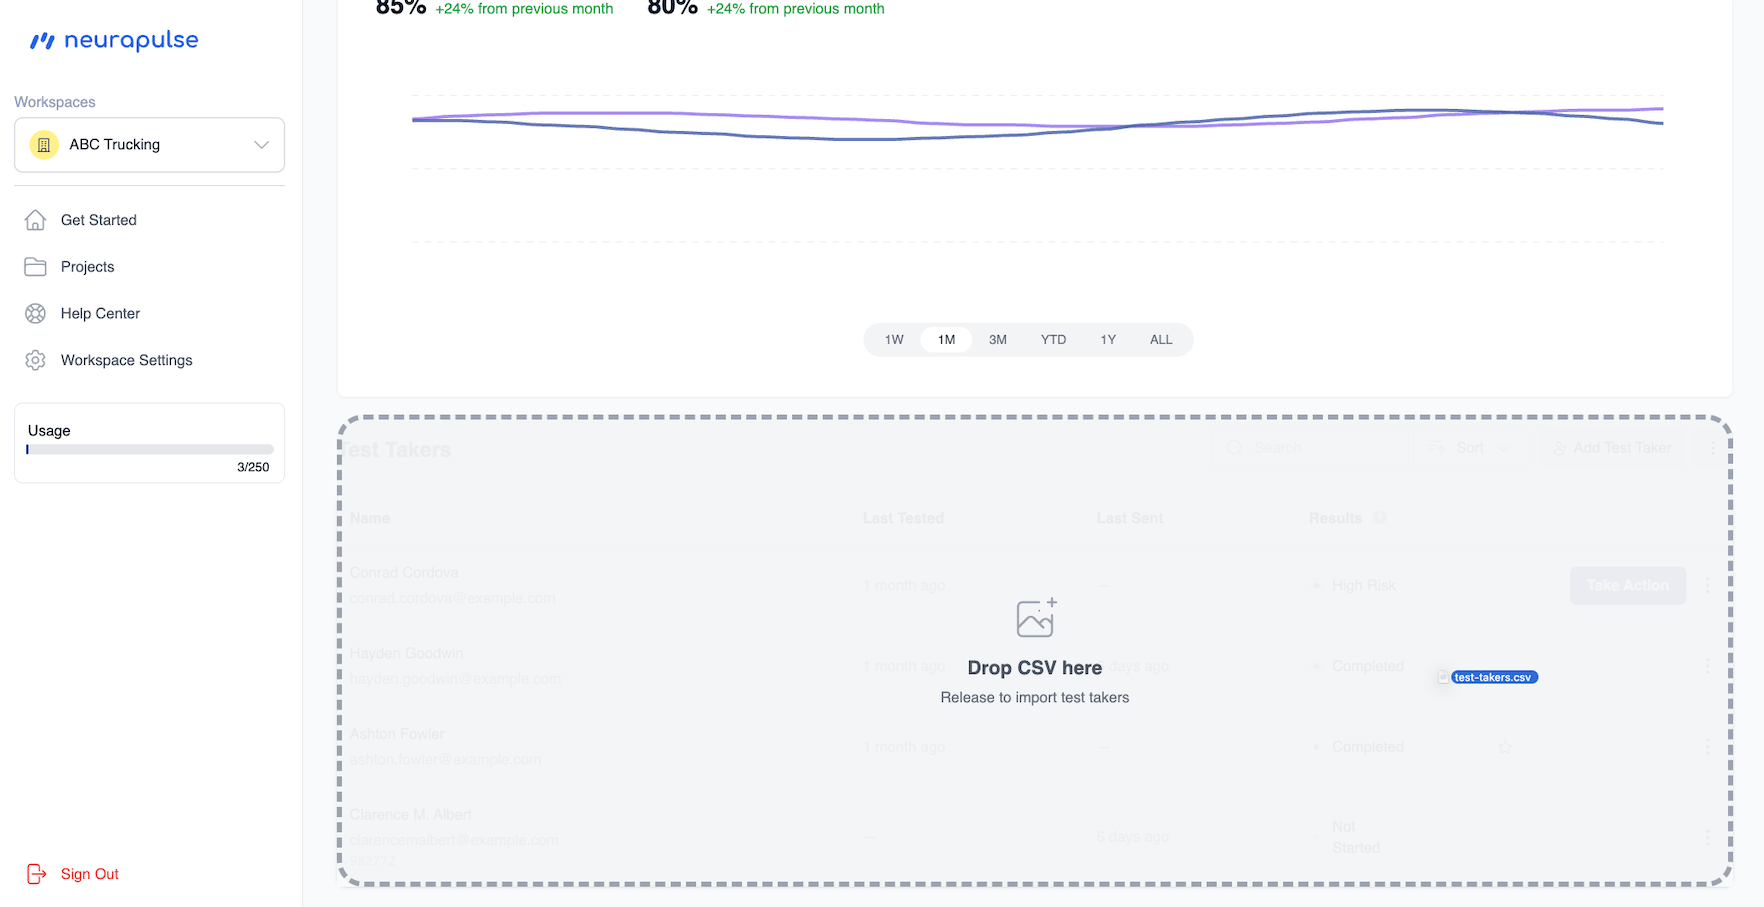
- The import preview will open automatically
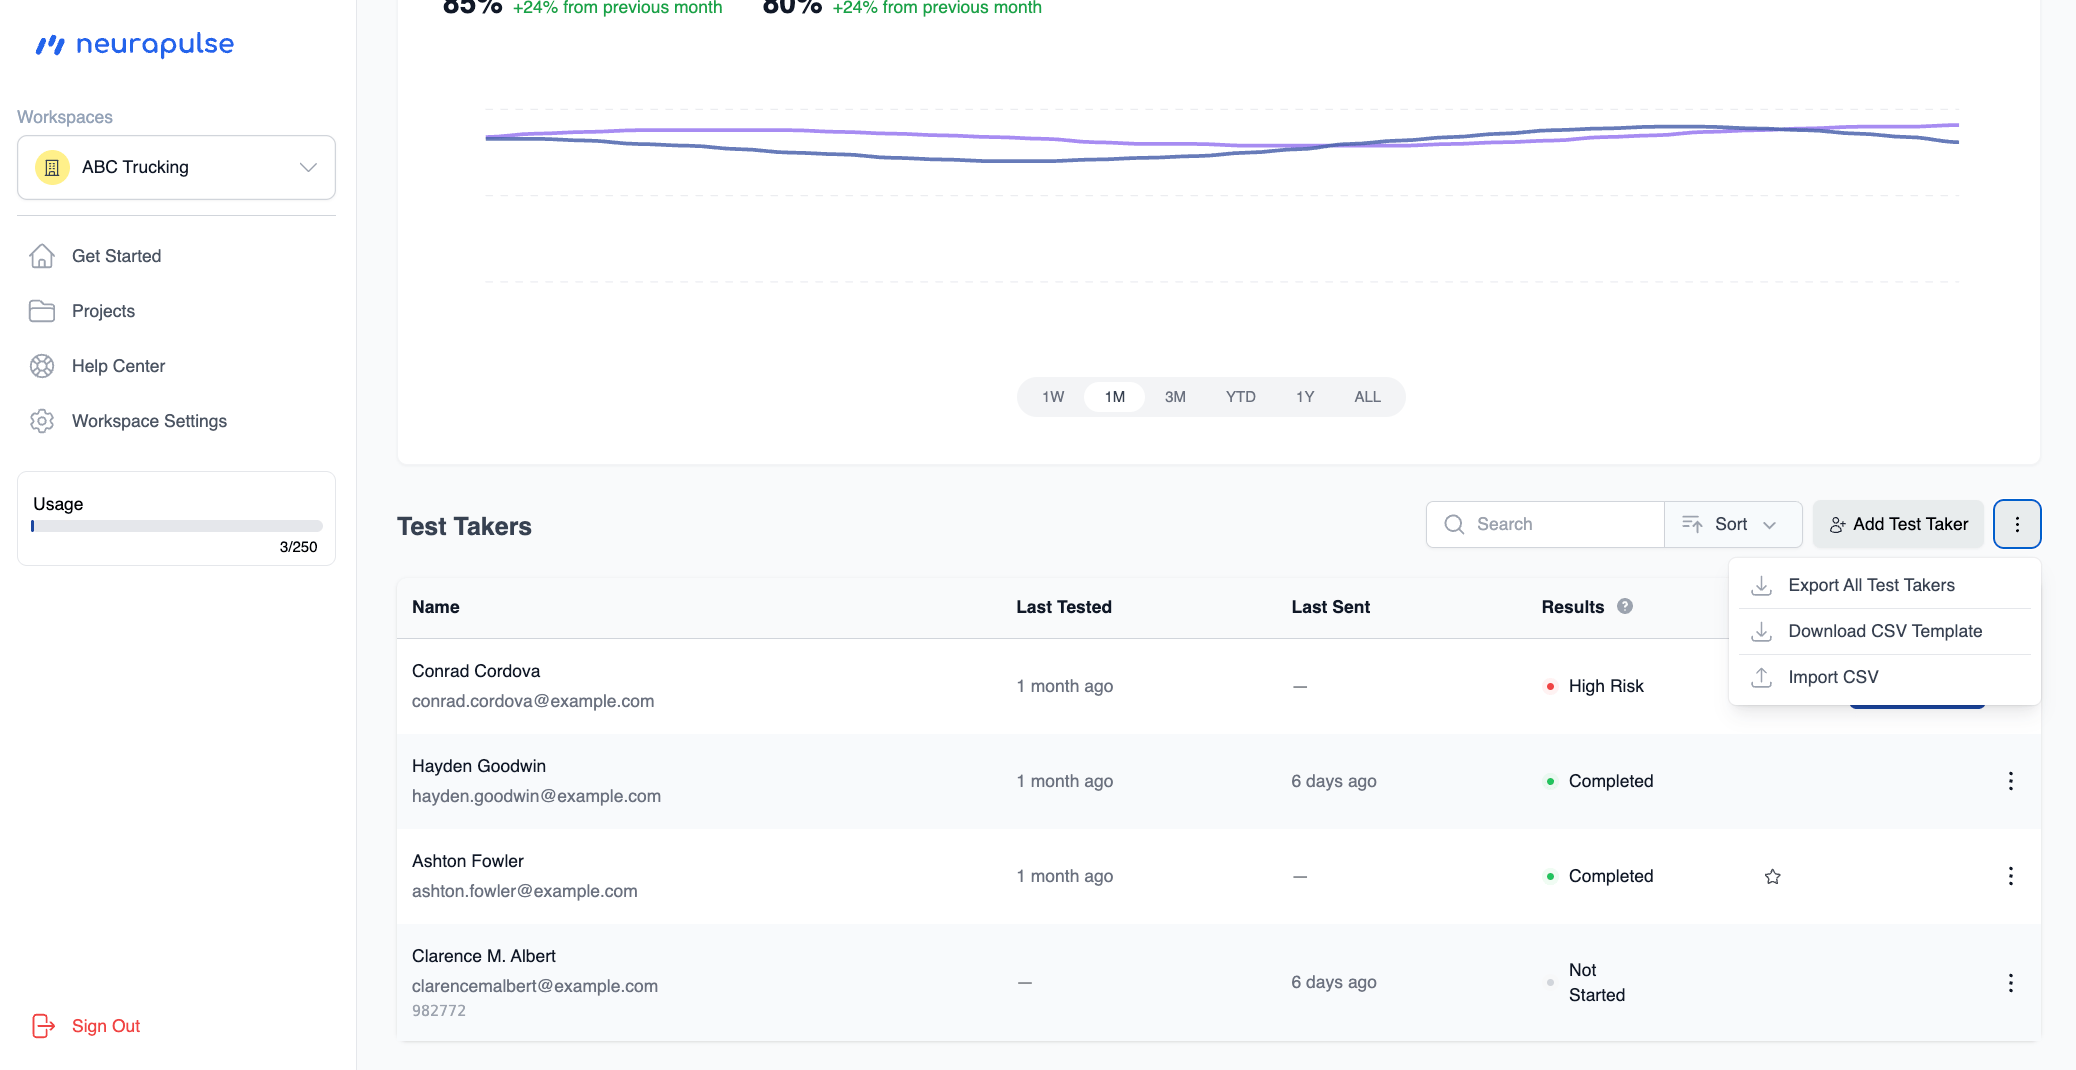
- Navigate to your project’s dashboard
- Click the
⋮button in the test taker table header (located next to the search and sort controls) - Select Download CSV Template to get a sample CSV file with the correct format (if needed)
- Fill in the template with your test taker information
- Click the
⋮button again and select Import CSV - Choose your CSV file to upload
Both methods work the same way - drag and drop is a quick alternative to using
the menu button. The
⋮ button is located in the test taker table header, to
the right of the search and sort controls.- firstname (required): Test taker’s first name
- lastname (required): Test taker’s last name
- email (required): Test taker’s email address (must be a valid email)
- yearofbirth (required): Test taker’s year of birth (use 4 digits, e.g., 1985)
- referenceid (optional): An identifier for your records (like an employee ID)
Lines starting with
# are treated as comments and will be ignored during
import. The downloaded template includes helpful comments explaining each
field.- The system checks your file for errors and duplicates
- A preview window shows:
- How many test takers are ready to import
- Any errors that need to be fixed (if there are any)
- A preview of the test takers that will be added
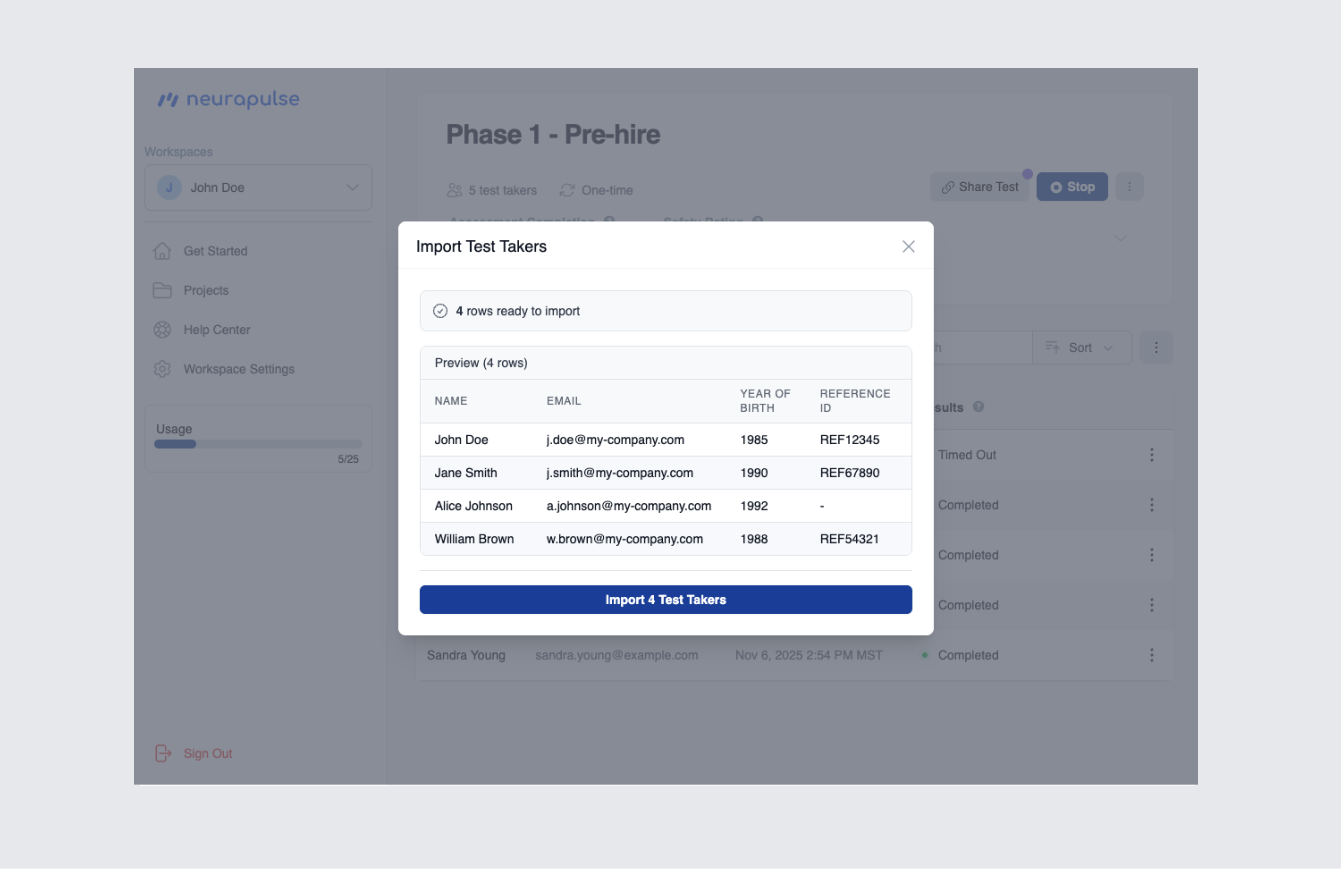
- Review the preview and click Import to add the test takers
- Use the downloaded template to make sure your file is formatted correctly
- Make sure all required fields are filled in
- Double-check that email addresses are valid
- Use 4-digit years for year of birth (e.g., 1985, not 85)
Downloading Test Takers as CSV
You can export all test takers from a project as a CSV file.- Navigate to your project’s dashboard
- Click the
⋮button in the test taker table header - Select Export All Test Takers
- A CSV file will be downloaded to your device
neurapulse_{project_name}_export_{date}_{time}.csv.
Exported fields:
- Reference ID
- Name (first and last combined), Email, Phone Number, Year of Birth
- Status (e.g. Completed, High Risk, Not Started)
- Identity Verified
- Top Performer (Yes if starred as a top performer, blank otherwise)
- Acknowledged (Yes if a High Risk result has been acknowledged, blank otherwise)
- Priority (risk priority rank used to sort the table)
- Last Sent (date the most recent test was sent to this person)
- Last Tested (date the most recent test was completed)
- Date Created
- Performance (sort order index — the row’s position when the table is sorted by performance, with 1 being the strongest performer) — one-time projects only
Raw scores are not included in the CSV export. A status indicator will appear
next to the button while the export is in progress.